Besides the background provided by Blogger, and unless otherwise stated, all of the images on this blog are property of the blog owner and author, and I do not authorize copying, editing, or any means of distributing or usage of my images without my written consent.

Tuesday, April 16

Peanut Butter Topped Apple Rings


Easy and with endless options, peanut butter topped apple rings are perfect for breakfast or a late night snack. Here is what you'll need:

One apple
Peanut Butter
Nuts, coconut, chocolate chips/shavings/chunks, oats, and/or whatever else you can think of


Slice the apple horizontally. Either core it first or cut the core out of each piece afterwards. Spread peanut butter thick on top of each slice and sprinkle your preferred toppings. This is really all there is to it! As I didn't have nuts today I used shavings of baker's chocolate and coconut and it was delicious. Give it a try and enjoy!

Monday, April 1

Light Chocolate Peanut Butter Donuts


I've been looking for a donut pan for a while and finally found one the other day. No, donuts are not healthy, but when they're baked instead of fried, they're actually not that bad for you. I will be trying many different recipes but I wanted to experiment the first time.

This is what you'll need:
1 box white cake mix
Other ingredients as directed
1/3 cup peanut butter
1/4 cup baking cocoa
Icing sugar

The boxed cake mix called for 3 egg whites (for which I used whole eggs) and 2 tbsp oil (substituted 1/3 cup yogurt). Applesauce works as well as yogurt, but these substitutions just make the cake thicker and moister. To make these even heavier, add 1/2 cup peanut butter instead of 1/3, and 1/2 baking cocoa.

Note: the icing sugar is for later!
 

Mix ingredients as instructed and beat in room temperature peanut butter until fully mixed. Add the baking cocoa and pour into donut pan, just to halfway, so the center isn't covered, otherwise there will be no hole in your donuts! My pan was nonstick but a little non stick cooking spray never hurts. The oven should be preheated as directed on the cake mix; mine was 350 degrees F. Bake, again, as instructed, approx 20 minutes (whatever directions are given for muffins works best). Be careful not to overbake; I left the last batch in about 10-15 minutes too long while taking these pictures. 4 of the 6 were salvageable, but darker and firmer, which didn't make them nearly as tasty.


You can ice to your preference or try a homemade glaze, or even simply sprinkle plain white sugar on top, but sifting a generous amount of icing sugar atop each donut and serving them with a glass of milk was heavenly.

Note: This would have made about 5 batches of donuts but due to a lack of time for baking, I poured the remainder after 3 batches into muffin tins, only 1/3 of the way up. This way they didn't become cupcakes by rising over the sides, but were instead like mini cakes, the perfect serving size so grabbing one (or two) won't give you the same guilt complex as slicing up a piece of cake will. Give this a try and experiment yourself; instead of chocolate and peanut butter, try sugar and cinnamon, diced fruit and nuts, or whatever else you can think of.

Enjoy!


Monday, March 18

Saint Patrick's Day Cake


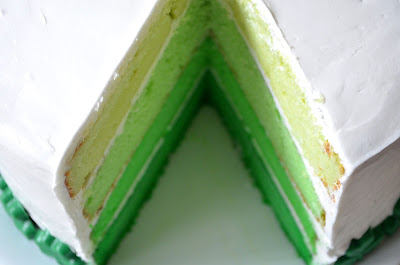
Happy Saint Patrick's Day! I did not wear green or any of that, but actually being part Irish, I think I can get away with it. Instead I made this fabulous green layered cake for the occasion, with help from my mom (who is incredible at icing cakes) and my brother (who helped me make the chocolates for the border around the base of the cake.)

This is what you will need:
2 boxes of white cake
Whatever other ingredients you are directed to use on the cake box
Green food colouring (we used a whole bottle and had to mix yellow and blue for the final layer, so make sure you have enough!)
3 tubs of whipped white frosting

For the chocolates:
Green chocolate wafers
Shamrock chocolate molds


It was actually fairly easy to make, but extremely time consuming. I started making it Sunday afternoon and due to not having enough frosting, finished this morning (Monday). The following method will work with any colours, so if you ever want to try something like one of those beautiful rainbow cakes, which I will be doing this summer, just follow these directions and use whatever colours you want.

Mix the cake with the needed ingredients as directed on the box. Mine required egg whites and oil, but to make it more dense I used whole eggs and instead of 2 tbsp of oil I substituted 1/3 cup of vanilla yogurt. Split the mix into four bowls evenly, and add the food colouring into each bowl to make the first layer one shade, and each next layer darker than the one before it. As I said before this will take a lot of food colouring. The amount in the little bottle you get in a pack of four colours will not be enough; I had a bigger bottle and had to use that, one of the smaller ones, and for the final layer, I still had to mix yellow and blue to make it dark enough.
 

Preheat the oven as directed, my cakes baked at 350 F for about 25-30 minutes each. Grease a round baking dish with butter, not cooking spray, or the cake will stick to the bottom. Fill with the contents of one bowl, while allowing for rising. The cake will be done when you can stick a toothpick in and it comes out clean. Run a knife along the side of the cake to loosen it, and after allowing the cake to cool, use a spatula to make sure the bottom is not stuck to the pan. Onto a plate lined with wax paper, carefully flip the cake over and out of the pan. Always place wax paper between cake layers.


If baking all cakes at once ensure each pan is the same size! If not, continue baking each different colour cake individually, placing it on top of the last layer on a sheet of wax paper. The order of layers doesn't matter yet. If the cake is becoming unstable just place some of the layers on a different plate. Once baking is completed, wrap the cakes in a plastic bag on the plate, tying the bag off and wrapping this in another bag so the cake doesn't become damaged. Place this in the freezer for at least an hour before frosting.

When the cake is cooled completely, almost frozen, begin with the darkest layer on a large, flat plate or serving tray and ice the top with a generous layer. Repeat with the shades of each layer going from dark to light. Without wrapping this time place in the freezer once more; if you attempt frosting the top and sides now, the cake could fall apart or tip over due to its height. Once frozen you can frost the top and sides!

For the chocolates around the base of the cake I simply melted some green chocolate wafers and filled a shamrock shaped chocolate mold (both given to me by my wonderful brother) using a method I detailed here. I made these the day before, and made nearly a hundred. It would have been exactly one hundred had we not eaten the chocolates as we worked!

It sounds fairly easy and it really is, but as I said before, it will take a long time, especially if like me you only have one baking pan. But it is well worth the effort! This method can be used with any colours, and you could have more or less layers if you prefer. My family has decided to make a Vancouver Canucks cake with three layers; blue, white and green; you really can try anything and a cake like this is sure to impress!

This is the final result:


Enjoy and have a wonderful day!

Thursday, March 7

Apple Cinnamon Baked Oatmeal


Years and years ago my uncle made this thing he called baked oatmeal. I've never been able to find a recipe that tastes quite like his, so yesterday I decided to experiment with it myself. I've discovered that all of the recipes I've been able to find online are either too gooey or unhealthy. This one is neither, being both the perfect consistency, and very very healthy. You can substitute the apple and cinnamon for almost anything, including nuts, berries, various fruit, and so many other things!

2 cups oats
1 1/2 tsp cinnamon
1 tsp baking powder
1/2 tsp salt
1 1/2 cup milk
2/3 cup brown sugar
1 egg
2 tbsp applesauce
2 apples, sliced (boil until nearly soft before hand) or diced into tiny cubes
Optional: Up to 1 cup of nuts, berries, chocolate, etc

Preheat the oven to 375 degrees F, and grease a baking pan.

In two separate bowls, mix together the dry and wet ingredients, then whisk together. Add in the apples and pour into the pan. Ensure the apples are evenly spread throughout, and are covered completely by the oatmeal mixture.

Bake for between 35 and 50 minutes; the top must be golden brown, the edges darker, and firm to the touch. About 10 minutes before it's done sprinkle 2 tbsp brown sugar and 1 tsp cinnamon over top. When the baked oatmeal is completely finished, remove from the oven and allow to cool for 5-10 minutes. Cut into 6 pieces and serve in a bowl or a glass with milk if desired. If not quite sweet enough, a little bit more brown sugar wouldn't hurt.

This would be perfect to make the night before and serve for breakfast. Just warm up each piece in the microwave and serve with milk!

Oatmeal Pumpkin Cookies (Vegan and Flourless)


1 1/2 cups rolled oats (gluten free if you prefer)
1/2 cup granulated sugar
1/4 cup brown sugar, firmly packed
1 tsp vanilla extract
1 tsp cinnamon
1 tsp nutmeg
1/2 cup pure pumpkin (room temperature)
1/4 cup applesauce
2/3 cup chocolate chips, nuts, or cranberries (not exceeding 2/3 cup); all must be finely chopped. This step is optional
In a bowl, mix together oats, white and brown sugar until there are no lumps. Add in cinnamon and nutmeg. In another bowl, whisk together pumpkin, applesauce, and vanilla extract. Add the wet ingredients into the dry and stir. If adding chopped nuts, cranberries or chocolate, this is where that step comes in. Make sure everything is mixed completely; using my hands after stirring seemed to be the best way for me to do this. Form dough into a simple large ball and cover, refrigerating for about 30 minutes.
Now is the time to preheat the oven while you're waiting, to 350 degrees F.

Form the chilled dough into small balls of about 1 inch diameters, and place on a baking sheet (paper lined or silicone) two inches apart. With a fork flatten each ball down ever so slightly. Bake between 25 and 30 minutes; because they contain pumpkin they take much longer to cook than regular cookies. Before completely cooked sprinkle white sugar on top for added sweetness. The cookies are done when they are firm to the touch, no longer so mushy you could re-form them, and a toothpick comes out clean from the thickest cookie. Cool and serve! I packed a few as a to-go lunch and they were even better cold.


Pumpkin is the perfect flavour for when the leaves begin to turn all shades of red and gold, and the air becomes crisp and cold, so these are fairly early, but that really doesn't change how good they are! I found they had an old fashioned taste to them, very warm and homey, and very very chewy. Try these out now and definitely bookmark this recipe for October!

Thursday, February 28

Banana Oatmeal Muffins (No Flour)


These are super easy, and even better, super healthy. Because they have no flour they're better for you and if you're going gluten free and missing baked goods, which so many people are doing now, you'll be happy to hear that for this recipe you don't need any flour at all.

I found this recipe in different forms all over the internet, each with something different than the last, so I took the basics they all agreed on and gave these a try. Most of the time old fashioned oats were called for but quick oats worked just as well.


2 1/5 cups oats
2 very ripe bananas (another half for topping)
1 cup yogurt
2 eggs
1/4 cup sugar
1 1/2 tsp baking powder
1/2 tsp baking soda
1 tsp cinnamon

Preheat the oven to 350 degrees F. Mix together the oats, yogurt, eggs and sugar. Mash the bananas and stir in. Add the final three ingredients and stir for a few minutes until well mixed. Spray muffin tin with non stick spray and spoon batter into cups, filling to about 3/4 full. Slice another half banana into half inch thick pieces and place on top of batter (sprinkle more cinnamon on top if desired).


These will bake for between about 20 minutes, but begin watching carefully at 15. Muffins are done when the edges begin to turn golden brown and are slightly firm to the touch. Remove from the oven and let cool for a minute or two before removing from pan. Butter and serve warm; perfect for breakfast or a quick snack before work! You could easily make the night before and refrigerate if you have a busy morning the next day and need a quick and healthy breakfast to go.

Wednesday, February 27

White Chocolate Cameos


This is more a post on how to do any sort of detailed mold, and I bought this one today to add a bit of traditionally delicate flair to my next old fashioned tea party! I love cameos and seeing them in a chocolate mold was too much for me not to buy this one!

Detailed chocolate molds
White chocolate wafers
Small squeeze bottle
Pot and metal bowl

Chocolate making instructions taken from my last post on caramel filled chocolates.

If this is the first time you're using your molds, take a cotton ball and polish the insides of the molds with it; this is how you clean them and will make the chocolates really shiny! Don't put the molds in the microwave or dishwasher, or even wash with hot water, or they'll melt.


Fill the pot halfway with water and set to medium. Pour chocolate wafers into the metal bowl and set over the pot of water (simmering, not boiling). Stir the wafers; when they've begun to melt, turn the heat to low. When fully melted spoon into squeeze bottle using an ice cream scoop. A normal spoon will work as well but is much messier. Make sure the lid is tight and then squeeze enough chocolate into each mold to come nearly to the top.


To level the chocolate tap on the counter or table several times until even. If you overfilled the molds it will spill over but once hardened you can simply break off any excess, and with practise you can avoid this. Stick the trays back into the fridge for about 10 minutes. The chocolates are done when you upturn the tray over a plate and they fall out(sometimes with a bit encouragement, either tapping them, pushing on them or twisting the tray). If they don't come out easily just stick them back in the fridge for a few more minutes.

You can use these same instructions for any chocolate molds you have, and any kind of chocolate! Head to my post on filling chocolates if your molds are deep enough and you want to change things up a bit. There is so much potential for experimenting with chocolate, I will be back soon with some next level chocolate recipes! Give this easy recipe a try; people are easily impressed by homemade chocolates, especially when they're gifted! And more importantly you will impress yourself as well by what you can do.