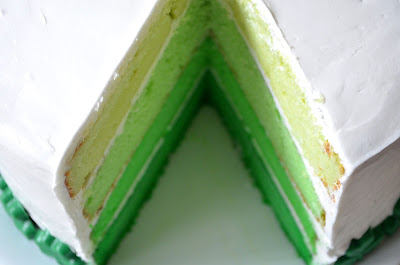
Happy Saint Patrick's Day! I did not wear green or any of that, but actually being part Irish, I think I can get away with it. Instead I made this fabulous green layered cake for the occasion, with help from my mom (who is incredible at icing cakes) and my brother (who helped me make the chocolates for the border around the base of the cake.)
This is what you will need:
2 boxes of white cake
Whatever other ingredients you are directed to use on the cake box
Green food colouring (we used a whole bottle and had to mix yellow and blue for the final layer, so make sure you have enough!)
3 tubs of whipped white frosting
For the chocolates:
Green chocolate wafers
Shamrock chocolate molds
It was actually fairly easy to make, but extremely time consuming. I started making it Sunday afternoon and due to not having enough frosting, finished this morning (Monday). The following method will work with any colours, so if you ever want to try something like one of those beautiful rainbow cakes, which I will be doing this summer, just follow these directions and use whatever colours you want.
Mix the cake with the needed ingredients as directed on the box. Mine required egg whites and oil, but to make it more dense I used whole eggs and instead of 2 tbsp of oil I substituted 1/3 cup of vanilla yogurt. Split the mix into four bowls evenly, and add the food colouring into each bowl to make the first layer one shade, and each next layer darker than the one before it. As I said before this will take a lot of food colouring. The amount in the little bottle you get in a pack of four colours will not be enough; I had a bigger bottle and had to use that, one of the smaller ones, and for the final layer, I still had to mix yellow and blue to make it dark enough.
Preheat the oven as directed, my cakes baked at 350 F for about 25-30 minutes each. Grease a round baking dish with butter, not cooking spray, or the cake will stick to the bottom. Fill with the contents of one bowl, while allowing for rising. The cake will be done when you can stick a toothpick in and it comes out clean. Run a knife along the side of the cake to loosen it, and after allowing the cake to cool, use a spatula to make sure the bottom is not stuck to the pan. Onto a plate lined with wax paper, carefully flip the cake over and out of the pan. Always place wax paper between cake layers.
If baking all cakes at once ensure each pan is the same size! If not, continue baking each different colour cake individually, placing it on top of the last layer on a sheet of wax paper. The order of layers doesn't matter yet. If the cake is becoming unstable just place some of the layers on a different plate. Once baking is completed, wrap the cakes in a plastic bag on the plate, tying the bag off and wrapping this in another bag so the cake doesn't become damaged. Place this in the freezer for at least an hour before frosting.
When the cake is cooled completely, almost frozen, begin with the darkest layer on a large, flat plate or serving tray and ice the top with a generous layer. Repeat with the shades of each layer going from dark to light. Without wrapping this time place in the freezer once more; if you attempt frosting the top and sides now, the cake could fall apart or tip over due to its height. Once frozen you can frost the top and sides!
For the chocolates around the base of the cake I simply melted some green chocolate wafers and filled a shamrock shaped chocolate mold (both given to me by my wonderful brother) using a method I detailed here. I made these the day before, and made nearly a hundred. It would have been exactly one hundred had we not eaten the chocolates as we worked!
It sounds fairly easy and it really is, but as I said before, it will take a long time, especially if like me you only have one baking pan. But it is well worth the effort! This method can be used with any colours, and you could have more or less layers if you prefer. My family has decided to make a Vancouver Canucks cake with three layers; blue, white and green; you really can try anything and a cake like this is sure to impress!
This is the final result:
Enjoy and have a wonderful day!


No comments:
Post a Comment